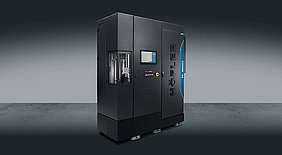
Considered one of the world’s leading trade shows for machine tools, EMO is held in Italy and Germany in alternating years. Headlined “the magic world of metalworking,” the industry meetup will take place from 4 to 9 October 2021, on the fieramilano Rho show grounds in Milan. System-supplier Klingelnberg will also be at the exhibit, presenting its innovations in Hall 02, booth D14. These include the debut of the Höfler Cylindrical Gear Roll Testing Machine R 300 for high-precision testing technology.
R 300 – The Gear Noise Finder
The Höfler Cylindrical Gear Roll Testing Machine R 300 is the latest machine development in the area of cylindrical gear technology. Due to the increasing quality requirements in large-scale transmission manufacturing, some transmission and vehicle manufacturers now require a certificate of quality for all gears installed in the powertrain. A further driver of ever-higher inspection levels is e-mobility, which places much higher demands on the noise behavior of a transmission due to the elimination of the combustion engine. To meet this challenge, Klingelnberg is building on roll testing technology, a familiar method from the bevel gear industry that is now moving into the world of cylindrical gears. Designed for all five roll testing methods, this compact machine is the ideal solution for anyone who wants to combine inspection cycles and reduce disassembly costs while benefiting from a user-friendly design. The many quality control requirements for gears can only be met with a flexible test machine.
Depending on the configuration, the R 300 provides the option of using all five roll testing methods. These include the single flank test, structure-borne noise and angular acceleration test, double-flank and helix roll test. Thus the R 300 can be used at every point in the production process chain for cylindrical gears – from monitoring the soft cutting to checking the hardening distortions, to evaluating the noise behavior of the installation-ready gear.
In terms of axis traversing paths, the R 300 covers the same component spectrum as the tried-and-tested Höfler Generating Gear Grinding Machine Speed Viper. Wheel components can be tested up to an outside diameter of 300 mm. In conjunction with the optional counter support, shafts up to 800 mm long in extreme cases can be analyzed to determine their running performance and noise behavior. Yet the machine’s footprint is a compact 2 m2 – saving costs on expensive production floorspace.
Reducing Measurement Times in Serial Measurement with a Hybrid Solution
Klingelnberg first presented the initial development stage of the hybrid solution with optical measuring technology at the EMO Hannover exhibition back in 2017. The application at that time centered on digitization of axially symmetrical gear components. Components such as bevel gears and cylindrical gears, and other geometries as well, can thus be measured with an extremely high point density (digitized), followed by additional processing. This additional processing is extremely flexible. In addition to simply depicting the results as a 3D model, comparisons can be made against a CAD target geometry, or a geometrical evaluation can be conducted by creating sectional views. This application is used for reverse engineering, for example.
Klingelnberg has made significant advances in the Optical Metrology system since 2017. Particularly in terms of sensor systems, measured data acquisition, and further processing, there has been significant progress. For this reason, Klingelnberg has been focusing its efforts on the entire signal chain in optical measuring technology and has joined forces with other development partners to develop a measurement system tailored specifically to the requirements of gear measurement. In this system, the active, current-carrying elements, such as a high-power light source, electronics and signal processing, are arranged separately from the sensor in the control cabinet. The distinct advantage of this is that it prevents thermal effects from occurring on the sensor itself as well as around the sensor – on the 3D tracer head, for example.
With the new measurement system, Klingelnberg presents a solution whose sensor system is ideally suited for measurements in the sub-micrometer range. This will allow the tactile pitch measurement to be replaced by optical measurement, significantly reducing measurement times in serial measurement applications.


