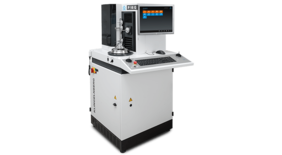
The world's leading trade show for quality assurance, Control in Stuttgart, will once again play host to an exhibition of innovations, May 9–12, 2017. Systems supplier Klingelnberg, a leading manufacturer of precision measuring centers for the gear industry, will be at its new location in Hall 6, Booth 6310, with a clear focus in this year’s presentation on measuring devices for the smaller diameter range. It will also unveil the newest member of the P series, the P 16 G – a measuring center that represents groundbreaking territory for the company.
Klingelnberg, the gear manufacturing specialist, will be celebrating a premiere with the new P 16 G: a measuring center for round components that was developed specifically for use on the production floor. The P 16 G is designed around measurement tasks outside of gears.
Whether turning blanks, ground workpieces, circular blades, spacers for circular blades, or ball bearings – the latest addition to the P series eliminates the use of gages during production and quality assurance of axially symmetrical parts. In fact, the “G” in P 16 G stands for “gage”. With this latest innovation, Klingelnberg has once again combined its experience in developing machine tools with its expertise in precision measuring technology. “The P series has long been a fixture in the gear manufacturing industry,” explains Dr. Christof Gorgels, Head of the Precision Measuring Center business area at Klingelnberg. “Close cooperation with our customers demonstrated the potential of applying the high mechanical accuracy of the Klingelnberg machine design and our powerful software in other industries and sectors as well.” The goal is to replace component-specific gages and multiple-position measuring devices, which are capital-intensive and inflexible. Klingelnberg's approach therefore is to combine all typical measurement tasks for a broad range of round components on a single measuring machine, one that is designed for use directly in the production environment. This makes the P 16 G an economically appealing strategy for direct production monitoring.
The new P 16 G – the software makes the difference
In striving to always stay close to the market and to meet customers’ needs, Klingelnberg brings to market with its P 16 G a precision measuring center that is fine-tuned specifically for the production of round components in the small diameter range and optimized for use on the shop floor. Every bit of experience gleaned from the compact P 16 machine design, which Klingelnberg also presented at Control two years ago, was incorporated into the P 16 G. Instead of gear software, the P 16 G comes equipped with software for dimension, form, and position measurement. The software records diameter and cylindrical form/conicity; measures axial runout, evenness, and angularity; and delivers a wealth of information for quality management as required.
Roughness measurement – now also on internal gears
The Klingelnberg roughness measurement system, which has already been successfully used in several hundred P machines, has now been expanded to include internal gear measurements. The possibility of carrying out systematic measurement using a fully automatic, CNC-controlled measuring run is what differentiates the Klingelnberg system from many other roughness measuring devices, and is why the system is highly valued by users. With the same benefits, the surface roughness of internal gears can now also be measured on the machines of the P series. Klingelnberg will demonstrate this innovation on the P 40, using a typical internal gear from the automatic transmission of a passenger car.
P 26 and P 40 – proven solutions for gear measurement
At the same time Klingelnberg will be presenting the P 26 and P 40, proven P series precision measuring centers for small diameter ranges, to the international audience in Stuttgart – optimal solutions for gear quality management processes that are guaranteed to ensure future success. The machine and software concept of the P series is optimized for measurement of complex drive components using a technology that replaces up to four conventional measuring machines: gear measurement, general coordinate measurement, form and position measurement, and roughness measurement. These measurement tasks can be fully automated in a single clamping. All machine models can be enhanced with individual options. This solution brings Klingelnberg close to the market, and the user. It is particularly interesting for the vehicle and aerospace industries, with their large numbers of drive components. However, other sectors benefit as well; it is not for nothing that the P series represents a widely used standard in the industry and serves as a reference for metrology institutes.
Expertise users have come to depend on, in a new location in Hall 6
At its new location at Booth 6310 in Hall 6, Klingelnberg will also be presenting its services and software solutions, alongside the measuring centers. And Klingelnberg has again been able to bring in Dr.-Ing. Günther Gravel, Head of the Institute for Production Technology at the University for Applied Sciences (HAW) in Hamburg, as a measurement analysis expert. On two days during the exhibition, he will be available all day at the Klingelnberg booth to offer his technical expertise and take part in lively discussions.


